Managing recipes (Inventory Core only)
A recipe is a list of inventory ingredients that make up both prep items and sales items. It contains a detailed list of ingredients, required quantity, and cost incurred to create the recipe. You can also specify the sequence in which to use the ingredients to prepare the recipe. Additionally, you have the option to set the recipe availability for a certain period of time. For instance, to make a special dish available for a specific period, set the end date on which the recipe is no longer available for usage.
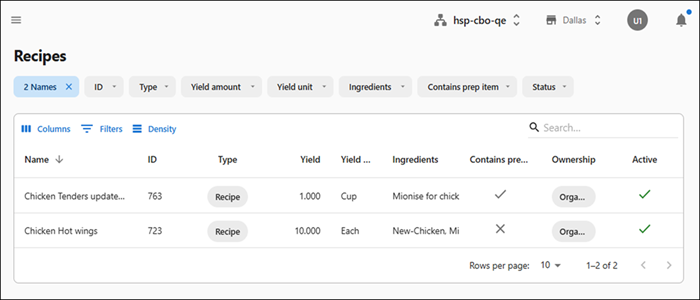
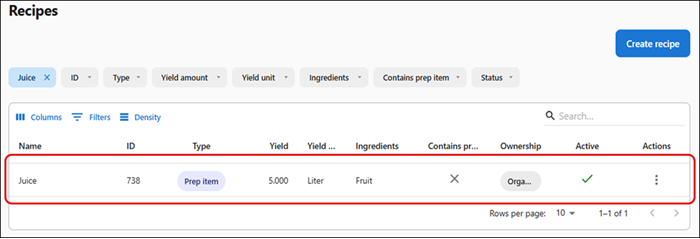
Name — Unique name of the recipe for identification. For example, Tea, Chicken salad.
ID — Unique identification number that the system auto-generates.
Type — Indicates the whether corresponding item being prepared is a recipe or prep item.
Yield — Expected number of quantities from the recipe. For example, if the recipe is 'Tea' and the 'Recipe makes' value is '2', then two cups of tea is expected to be prepared using the selected ingredients.
Yield unit — Units of measurement of the recipe. For example, 'Each' indicates each cup of tea.
Ingredients — List of inventory items used to prepare the recipe. For example, the ingredients required to prepare 'Tea' includes milk, sugar, and water.
Contains prep item — Indicates whether the recipe contains prep item.
Ownership — Indicates the level at which the recipe is applicable, either for entire organization or specific sites.
Active — Indicates whether the recipe is currently active for usage or not.
Creating a new recipe without prep item
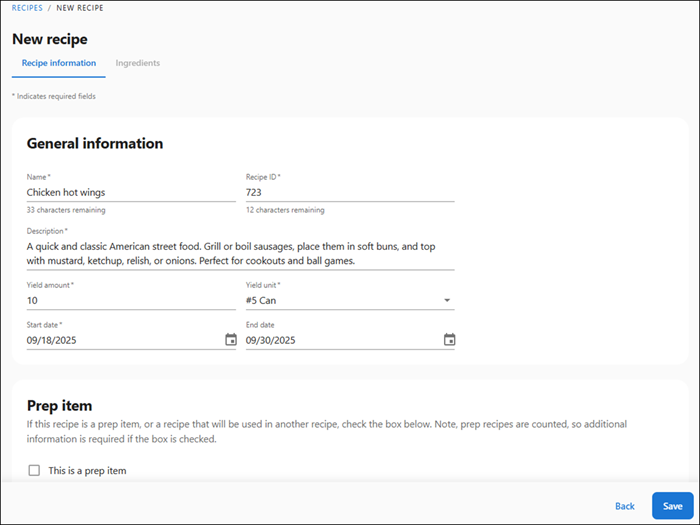
You can create a recipe that is a final recipe served directly to customers. For example, Chicken Hot Wings.
To create a recipe without prep item:
-
Select Inventory > Menu > Recipes. The Recipes screen appears.
-
Click Create recipe. The New recipe screen appears. By default, the General information tab is selected. A unique recipe ID auto-populates for the recipe.
-
Enter a unique name for the recipe (maximum of 50 characters). For example, Tea.
-
Enter a description for the recipe, such as ‘Chicken drumstick fried.’
-
Enter the expected output quantity in ‘Yield amount.’ For example, 1 indicates one full chicken drumstick.
-
Select the unit of measure in ‘Yield units’.
-
Select the start date and end date to indicate the period for which the recipe is available. After the end date, the recipe is deactivated.
-
Click Save to confirm the recipe details. The 'New recipe saved' success message appears. Additionally, the created recipe appears on the Recipes home screen.
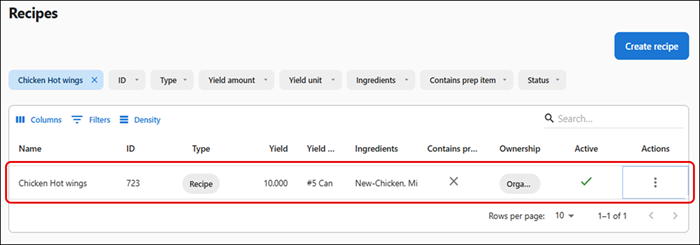
Next step is to add the ingredients.
Creating recipe with prep items
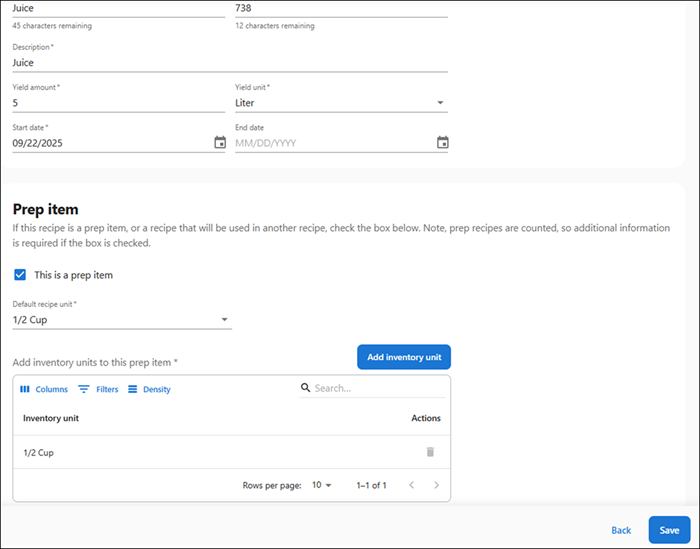
You can create a recipe that is a prep item used as an ingredient in any other recipes. For example, Ketchup.
To create a recipe with prep item:
-
Follow the 'step 1' through 'step 7' in creating a new recipe.
-
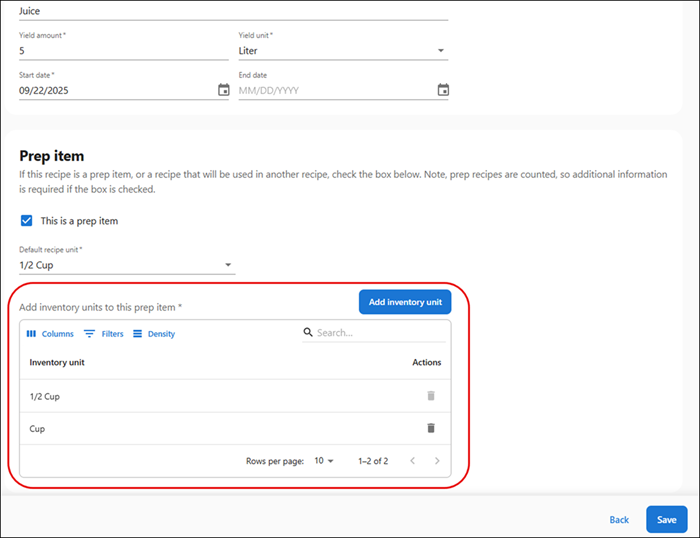
Select the This is a prep item option. Upon selection, the option to select unit of measure of the prep item appears.
-
Select the default recipe unit.
-
(Optional) If you want to include additional inventory units, click Add inventory unit, select either the industrial unit of measure or select a custom unit of measure, and click Add.
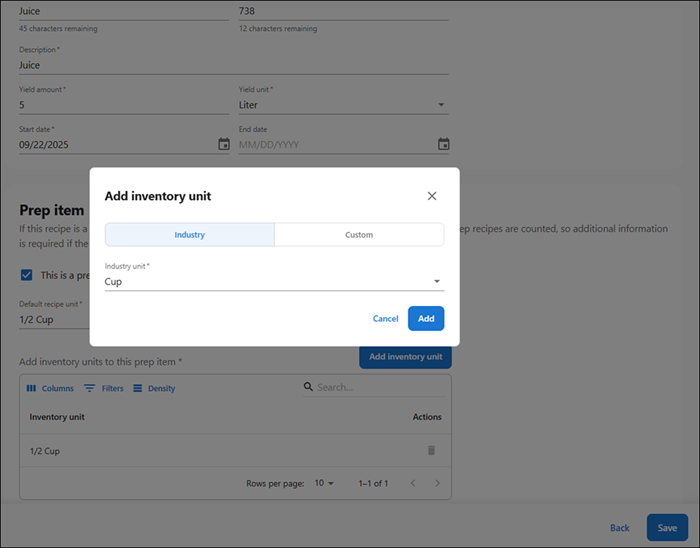
The corresponding inventory unit appears in the Add inventory units to this prep item section.
-
Click Save to confirm the details. The 'New recipe saved' success message appears.
Next step is to add the ingredients.
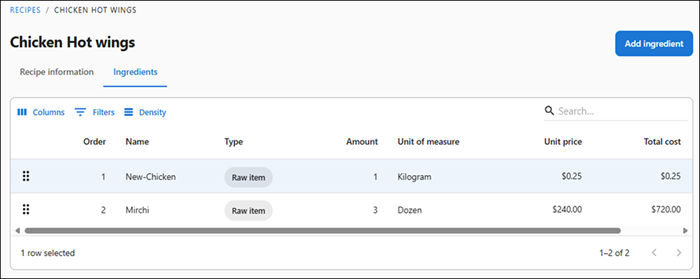
Adding ingredients to recipe
The Add ingredient option allows you to include individual ingredients in a recipe.
To add ingredients to a recipe:
-
Upon successfully creating the recipe, the Ingredients tab is enabled for the recipe. Click the Ingredients tab.
-
Click Add ingredients. A sliding panel to enter the ingredient details appear. Additionally, a unique order ID is auto-populated to indicate the sequence number of the ingredient.
-
Select the ingredient from the All, Raw items, or Prep items options. Based on the selection, the type of ingredient is auto-populated as either ‘Raw item’ or ‘Prep item.’Select the raw item. The raw items available in the ASM system are auto-populated in this option.
-
Enter the quantity of raw items in ‘Amount’.
-
Select the unit of measure required for the recipe. The unit price of the ingredient and total ingredient cost appears in the Unit price and Total cost options, respectively.
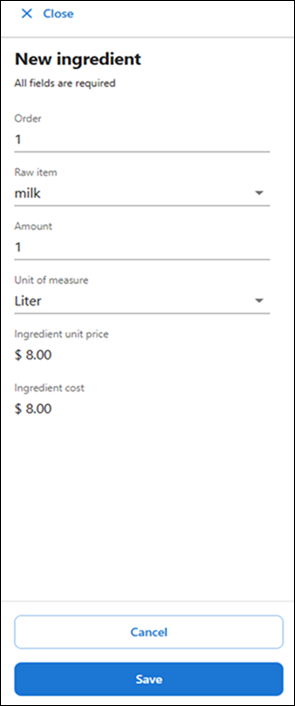
-
Click Save to confirm the added ingredient. The ‘New ingredient saved’ success message appears.
If you want to add more ingredients, click Add ingredients and repeat step 2 through step 6 to add more ingredients to the recipe.
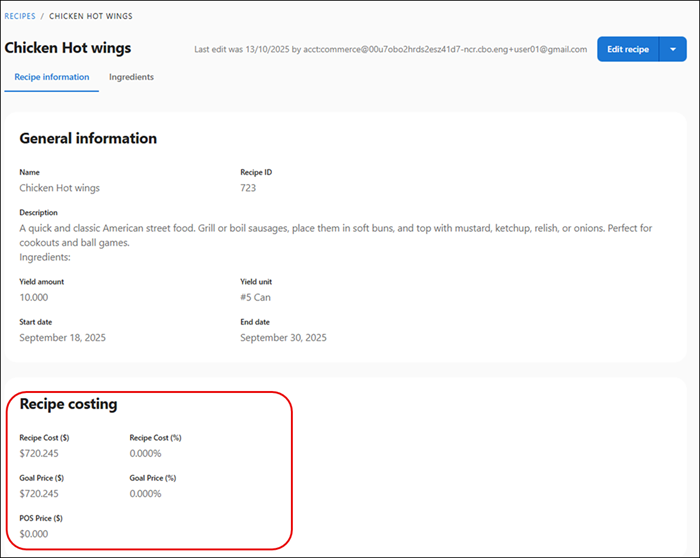
After adding all the ingredients, the following details are updated in the ‘Recipe costing’ section under the Recipe information tab:
Recipe Cost ($) — Total cost to prepare the recipe.
Recipe Cost (%) — This is for future use.
Goal Price ($) — Target price, in amount, expected price for the recipe. This value is calculated based on the Goal Price (%).
Goal Price (%) — Target price, in percentage, expected for the recipe.
POS Price — This is for future use.
Updating a recipe
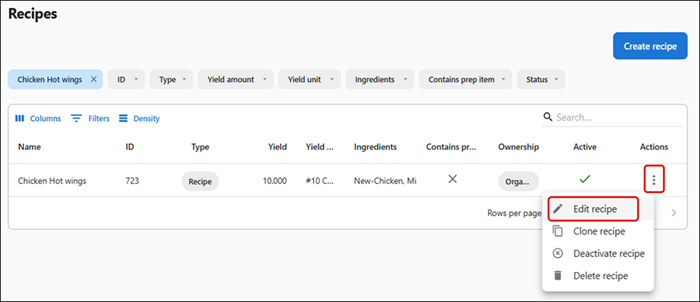
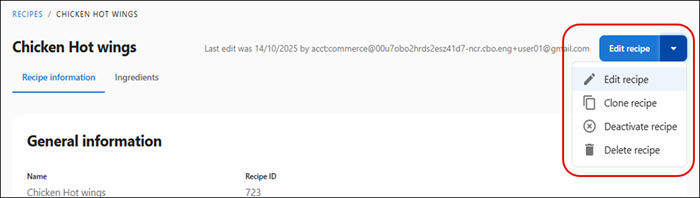
Use the ‘Edit recipe’ option to update an existing recipe. The options to edit a recipe is available on the home page (by clicking the three-dotted icon) and on the detailed-view page of the recipe.
To update an existing recipe:
-
Select Inventory > Menu > Recipes. The Recipes screen appears.
-
Perform one of the following:
Click the three-dotted icon against the recipe that you want to update and select Edit recipe.
Or,
Select the existing recipe that you want to update, a detailed-view of the recipe appears. Click Edit recipe.
-
Update the recipe details as required in the Recipe information tab.
-
The yield unit cannot be updated if the prep item is already mapped to a sales item.
-
Likewise, if a recipe is already mapped to a sales item and you try to update the yield unit, the following pop-up appears:
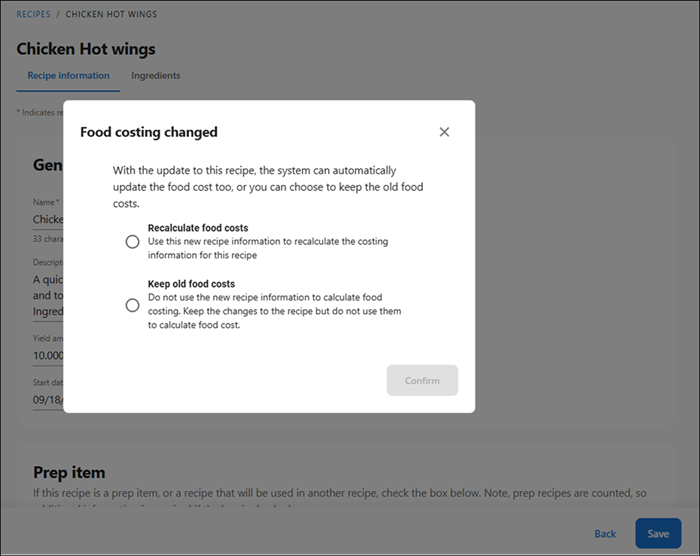
Select one of the following options:
- Recalculate food costs — The costing of recipe is recalculated from the start date when the recipe is available.
- Keep old food costs — The old costing is unchanged and food cost for future transactions are impacted as per the selection made here.
Once the selection is completed, click Confirm to update the food costing.
-
-
Click Save. The ‘Recipe was successfully updated’ message appears.
-
Click the Ingredients tab. The list of ingredients for the selected recipe appears.
-
Select the ingredient that must be modified.
-
Click Edit on the sliding panel.
-
Update the ingredient details as needed.
Note: You can only change the order sequence and amount of ingredients used. You cannot update the raw items or unit of measure. If you want to delete an ingredient, click Delete to remove the ingredient from the recipe.
-
Click Save to confirm the changes. The ‘Ingredient was successfully updated’ message appears.
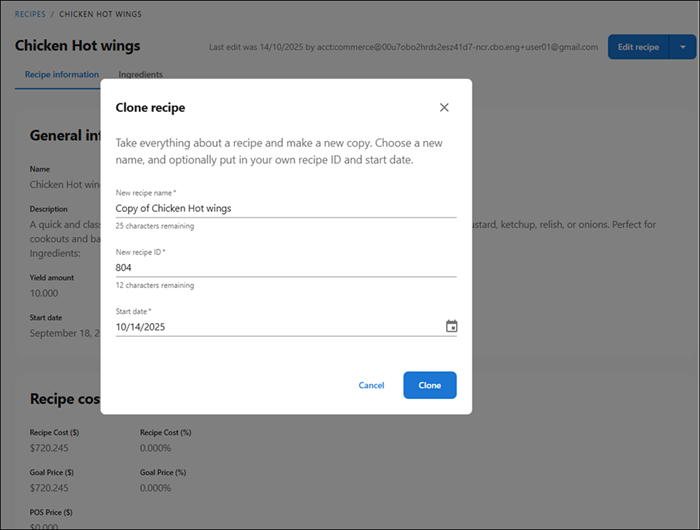
Cloning a recipe
Use the ‘Clone recipe’ option to easily duplicate an existing recipe record to update it as required.
To clone a recipe:
-
Select Inventory > Menu > Recipes. The Recipes screen appears.
-
Perform one the following:
Click the three-dotted icon against the recipe that you want to update and select Clone recipe.
Or,
Select the existing recipe that you want to clone, a detailed-view of the recipe appears. Click the drop-down available on the Edit recipe button and select Clone recipe. The Clone recipe pop-up window appears.
-
Enter a new name for the recipe. By default, the recipe name appears as ‘Copy of existing name of recipe’. For example, if you are cloning the ‘Chicken Hot wings’ recipe, the name default appears as ‘Copy of Chicken Hot wings’ appears, you can modify it as required. Additionally, a default recipe ID appears, which you can modify as required.
-
Select the start date to indicate the date from when the recipe is available for usage.
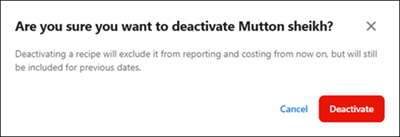
Deactivating a recipe
Use the ‘Deactivate recipe’ option to temporarily remove the recipe from business use and remove it from any future reporting and costing. However, the previous costing of the corresponding recipe is retained.
You can reactivate the recipe later whenever required.
To deactivate a recipe:
-
Select Inventory > Menu > Recipes. The Recipes screen appears.
-
Perform one the following:
Click the three-dotted icon against the recipe that you want to deactivate and select Deactivate recipe.
Or,
Select the existing recipe that you want to deactivate, a detailed-view of the recipe appears. Click the drop-down available on the Edit recipe button and select Deactivate recipe.
A pop-up appears to confirm the deactivation.
-
Click Deactivate. The 'Recipe name has been successfully deactivated' message appears.
Activating a recipe
Use the 'Activate recipe' option to reactivate the recipe and the costing resumes.
To activate a recipe:
-
Select Inventory > Menu > Recipes. The Recipes screen appears.
-
Perform one the following:
Click the three-dotted icon against the recipe that you want to deactivate and select Activate recipe.
Or,
Select the existing recipe that you want to activate, a detailed-view of the recipe appears. Click the drop-down available on the Edit recipe button and select Activate recipe. The recipe is reactivated successfully.
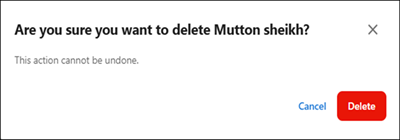
Deleting a recipe
Use the ‘Delete recipe’ option to remove the recipe from the system.
To delete a recipe:
-
Select Inventory > Menu > Recipes. The Recipes screen appears.
-
Perform one the following:
Click the three-dotted icon against the recipe that you want to deactivate and select Delete recipe.
Or,
Select the existing recipe that you want to delete, a detailed-view of the recipe appears. Click the drop-down available on the Edit recipe button and select Delete recipe. A warning message indicating that the deleted recipe cannot be retrieved appears.
-
Click Delete to confirm.
Return to "About inventory management," or continue to "Viewing and mapping sales items."